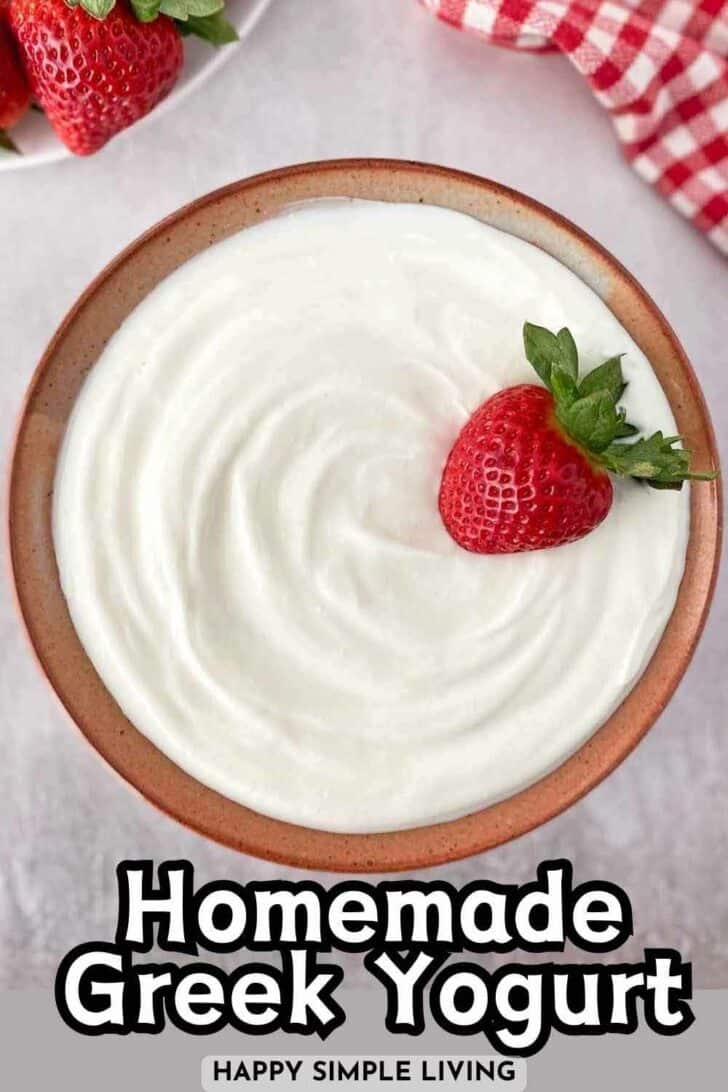

Have you ever wanted to make your own Greek yogurt? I’ve made this recipe countless times, and you can, too. Just follow the easy directions and enjoy thick, creamy homemade Greek yogurt any time you like.
I first published this recipe on March 6, 2011. Hundreds of readers added comments and questions over the years, so now I’ve updated the post with new photos and more information.
Back in 2011 a blog was often like an online diary, but these days most readers want the information presented quickly and concisely. “We don’t want to read your life story!” they say, so I’ve removed my original scintillating intro about tasting FAGE Greek yogurt for the first time at my aunt’s home.
There’s even a “jump to recipe” button at the top of the post now, so you can skip the step by step tutorial if you wish and go straight to the printable recipe card. What a time to be alive!
Shall we make some delicious homemade Greek yogurt?

This post may contain affiliate links. Please read our disclosure policy.
Why You’ll Love This Recipe
Amazing Flavor and Texture: Thick, creamy Greek yogurt compares to regular yogurt like a home-grown tomato compares to a February grocery store tomato; it tastes a kazillion times better!
Economical: If you eat a lot of Greek yogurt like I do (almost every morning), the cost can add up. Making your own yogurt from scratch is easy and saves money!
All Natural: You’ll have total control over the ingredients, so you can avoid the additives in store-bought yogurt and make a very pure product.
Ingredients Notes
You only need two simple ingredients to make 48 ounces of your own fantastic, creamy, thickened yogurt:
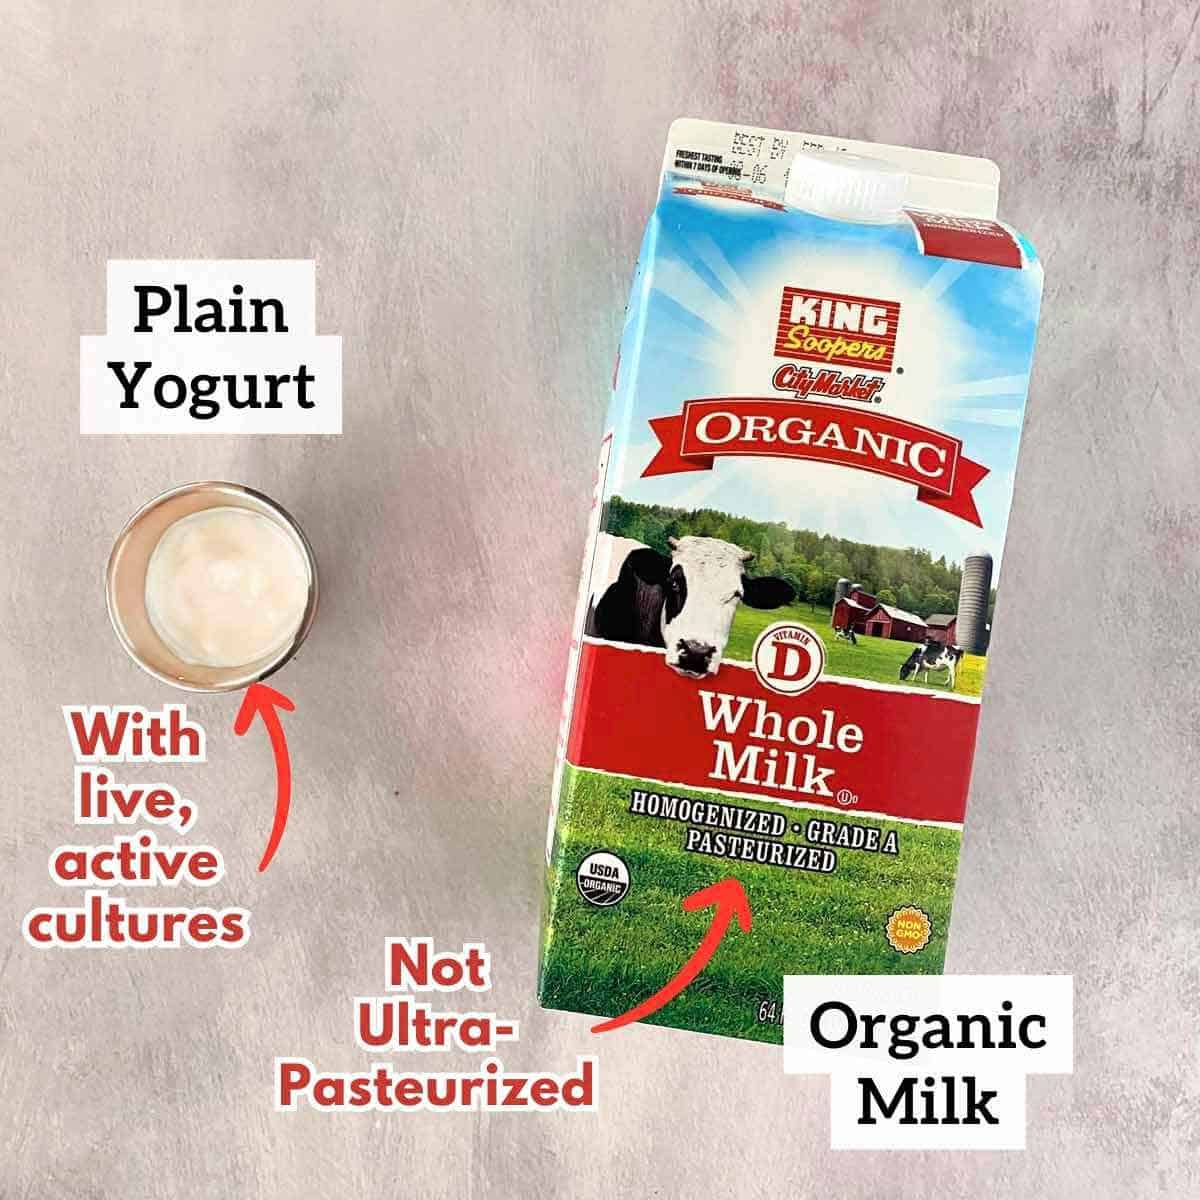
1/2 gallon milk – fat content of your choice. I generally use organic whole milk or 2% milk. The higher the fat content in the milk you use, the creamier your yogurt will be.
Note: I prefer to prepare this recipe with organic milk, which is produced without any synthetic chemicals, hormones or antibiotics. (Antibiotics may interfere with the yogurt-making process.)
Make sure you use regular pasteurized milk instead of ultra-pasteurized. Why? Ultra-pasteurized milk is briefly heated at a high temperature that can kill the live cultures in the milk.
2 to 3 tablespoons plain prepared yogurt (make sure it contains live, active cultures)
Note: After making your first batch, you can simply save a couple tablespoons of your homemade yogurt to start the next batch. I love that this process becomes indefinitely sustainable!
Money Saving Tip
If your grocery story has a bargain section in the dairy case, check for organic milk that is nearing its expiration date.
This milk is perfect for yogurt making, and is often sold at a discount.
Cooking Equipment
Here’s what you’ll need to prepare this homemade Greek yogurt recipe:
- Cooking thermometer – either a candy thermometer or an instant-read thermometer work best
- Large mesh strainer
- Mixing bowl that the strainer fits inside, so the yogurt can drain
- Cheesecloth to fit 4 layers when draped over the strainer
Step by Step Directions
To make regular yogurt without a yogurt maker, I’ve always followed the basic recipe in the Joy of Cooking cookbook.
The finished yogurt is then strained through cheesecloth for a few hours to release extra whey and liquids and transform into creamy Greek yogurt. Here’s the process:
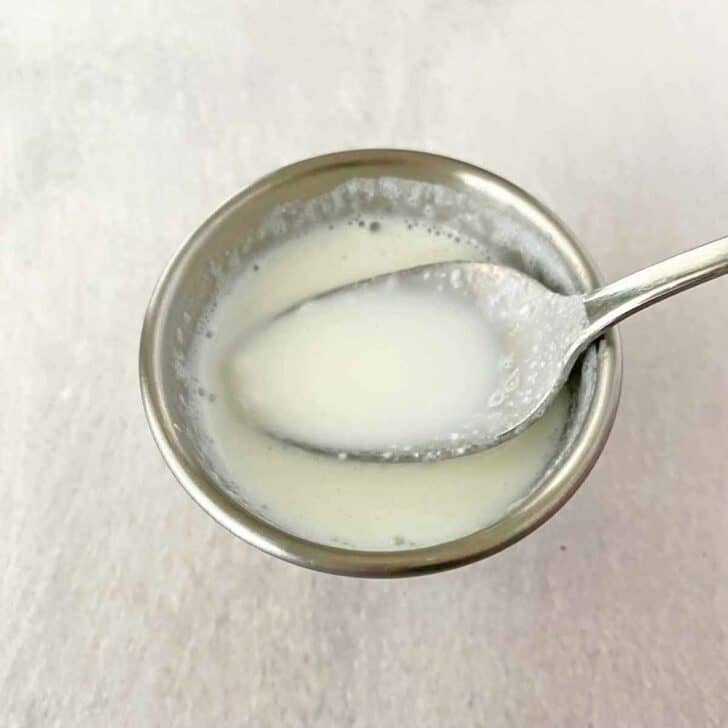
STEP ONE: To begin, pour 2 tablespoons of the milk in a small bowl and reserve.
STEP TWO: Pour the rest of the milk into a double boiler or heavy-bottomed pan and turn the heat to medium. If using a double boiler, cover the milk. If the pot is directly on the burner, stir it and watch it very, very carefully so you don’t burn the bottom.

STEP THREE: Heat the milk to 180 degrees F. It helps to clip a candy thermometer to the side of the pan so you can carefully watch the temperature as it rises. Or you can check frequently with an instant read thermometer.
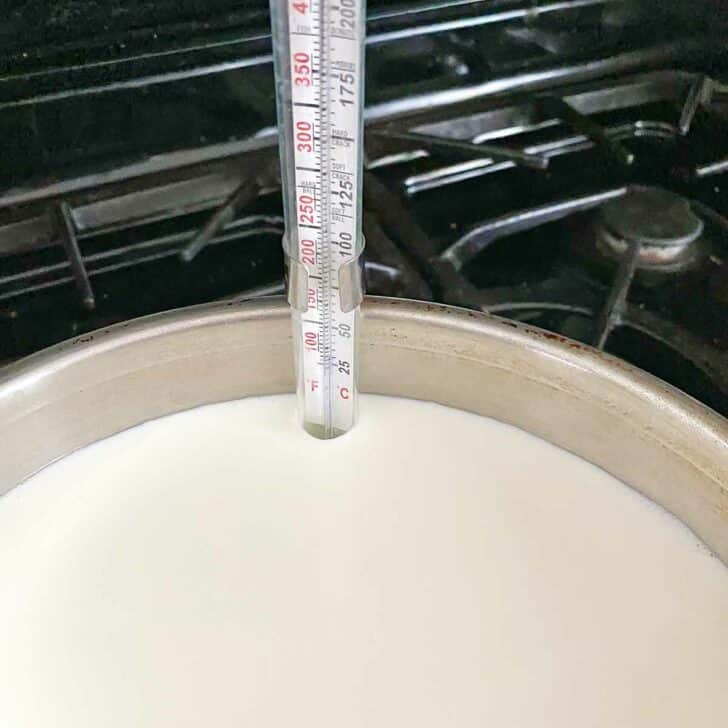

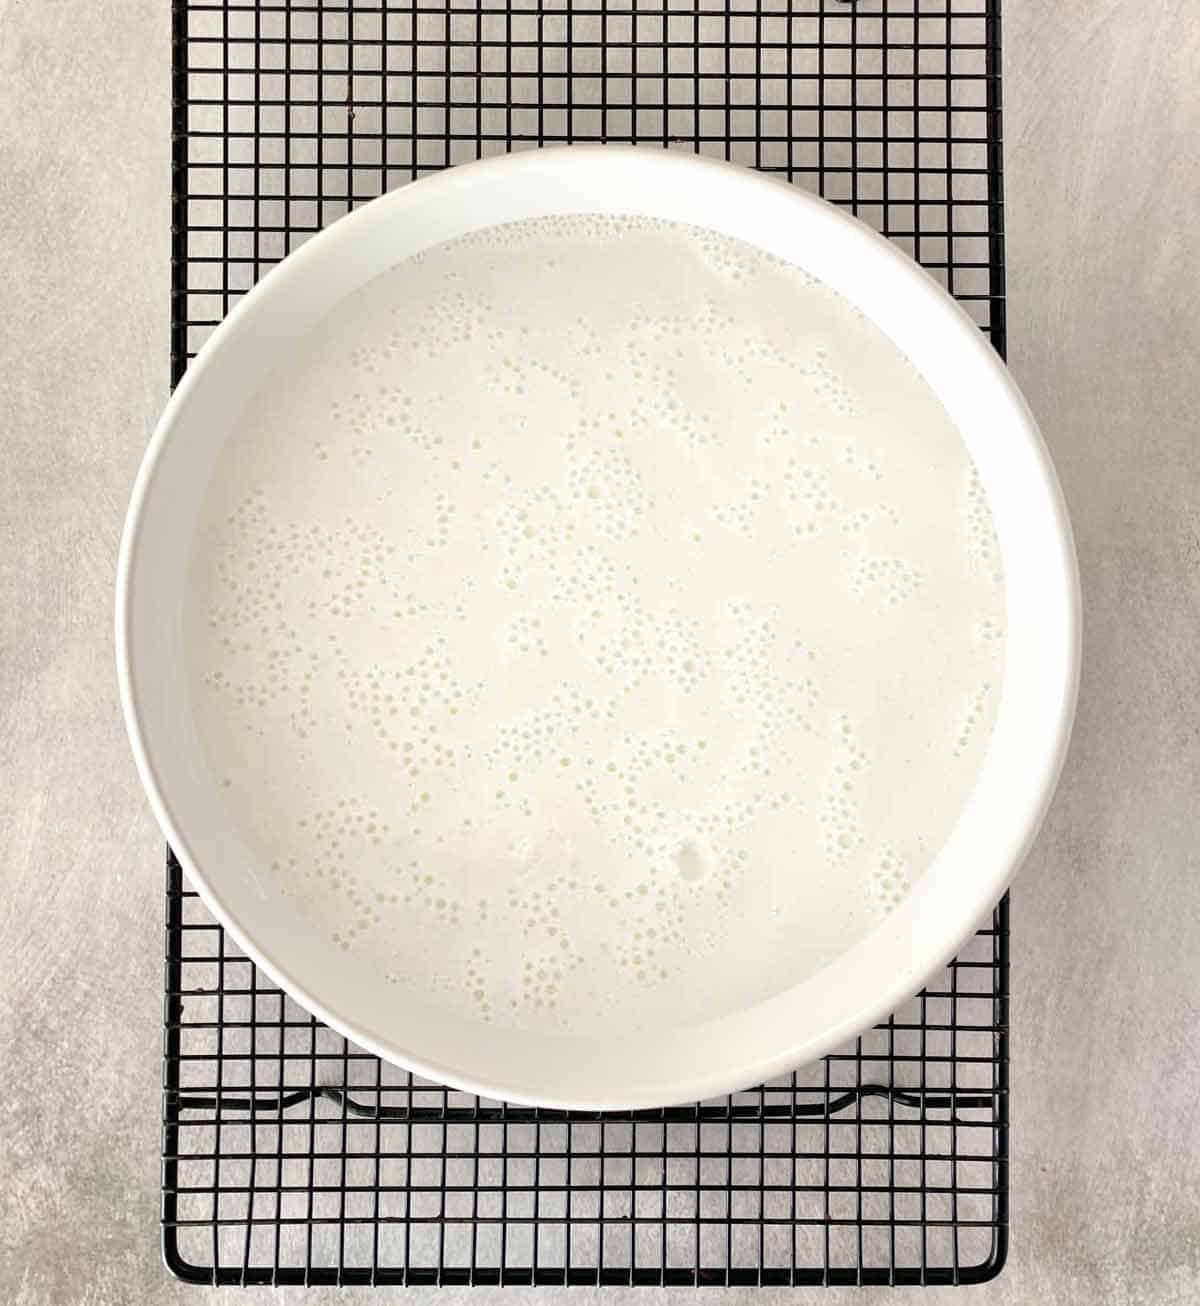
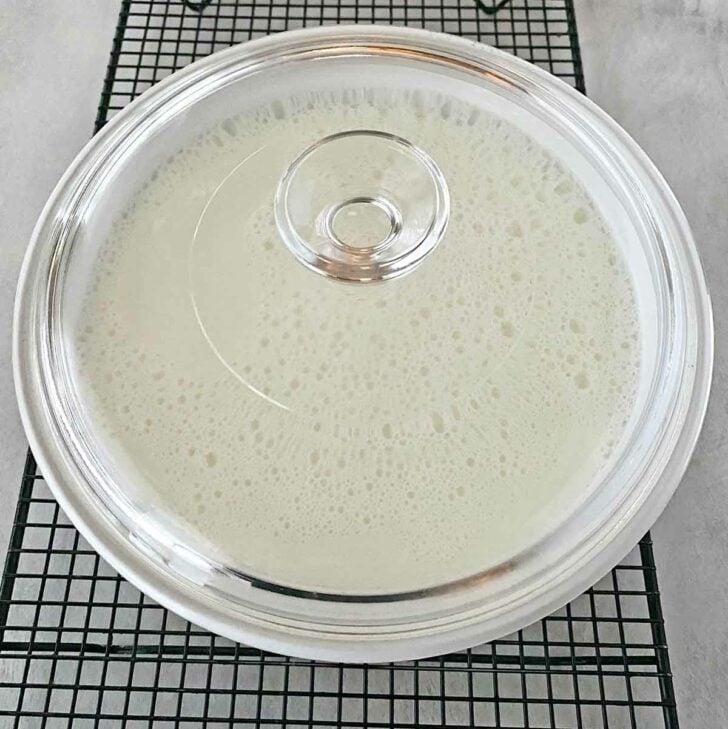
STEP FOUR: As soon as the temperature reaches 180 degrees, F, immediately remove the pot from the stove. Pour the milk through a wire mesh strainer into a 3 quart baking dish and leave it uncovered.
Put the dish on a cooling rack at room temperature, and let the milk cool to between 105 and 110 degrees F. Stir it a few times during the cooling process to prevent a “skin” from forming on top of the milk.
In our kitchen, this took about 50 minutes. (Note: remember to leave the dish completely uncovered at this stage, so the good bacteria from the air can start working their magic!)
STEP FIVE: While you’re waiting for the milk to cool, turn on your oven to the “warm” or “proof” setting. If your oven doesn’t have that setting, turn it to 150 degrees F.
STEP SIX: Combine the 2 tablespoons of milk you saved with 2 1/2 tablespoons prepared yogurt in a small bowl and reserve.
PRO TIP: Resist the temptation to add more than 3 tablespoons yogurt. According to the Joy of Cooking, “you may wonder why so little starter is used and think that a little more will give a better result. It won’t. The bacillus, if crowded, gives a sour, watery product.”
STEP SEVEN: Once the milk has cooled to between 105 and 110 degrees, add the yogurt-milk mixture and stir well to combine. (Don’t forget this important step.) Put the lid on the casserole dish and cover it with a dishtowel to help insulate it from temperature fluctuations.
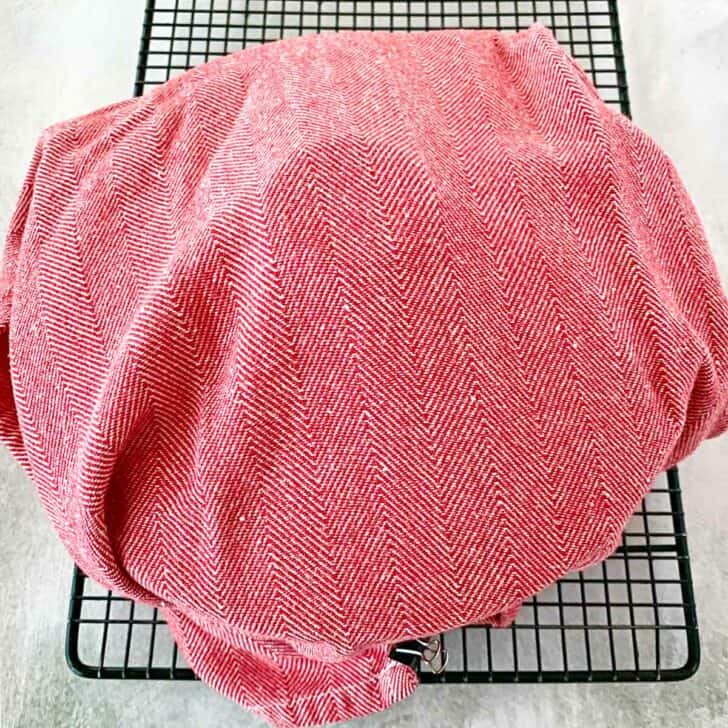
STEP EIGHT: Turn your oven off, but now turn the oven light on. Just the light from the oven should keep the dish warm enough to enable the yogurt-making process.
Put the towel-covered dish in the oven, making sure that the towel isn’t touching the oven lightbulb, and leave the oven light on.
Note: If your oven light doesn’t emit any heat, you can alternately put the towel-covered dish on a heating pad set on “low,” or put it in a cooler with a snug-fitting lid and several sealed jars of hot water to maintain the heat.
Leave the yogurt undisturbed for 7 or 8 hours, or overnight.
STEP NINE: In the morning, carefully take the dish out, unwrap it and remove the lid, and check to see whether the milk has turned to yogurt. After ten hours, this is how our yogurt looked:
If your batch isn’t quite thickened, return it to the oven and check on it again in an hour. Once the yogurt is sufficiently thickened, you can stop at this stage if you want regular yogurt. Just stir the mixture and refrigerate it; you may need to pour off a little of the watery liquid. Don’t forget to turn off the light in your oven!
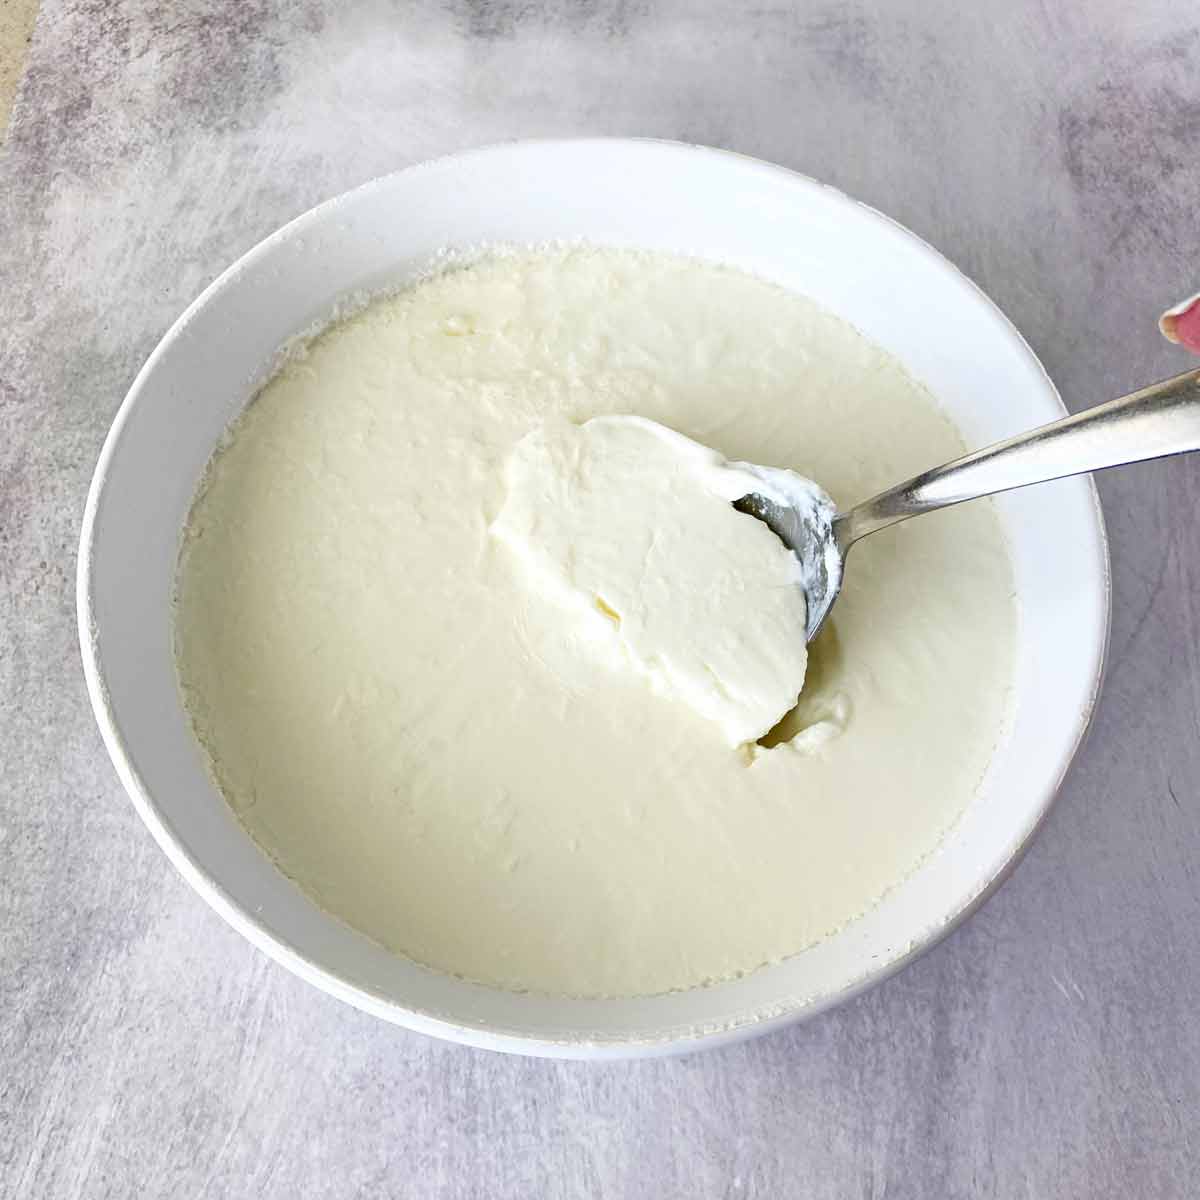
STEP TEN: For creamy Greek yogurt, refrigerate the yogurt in the covered dish for at least three hours to allow it to completely cool and thicken.
Meanwhile, line a large strainer with four layers of damp cheesecloth and find a bowl that the strainer will fit inside:

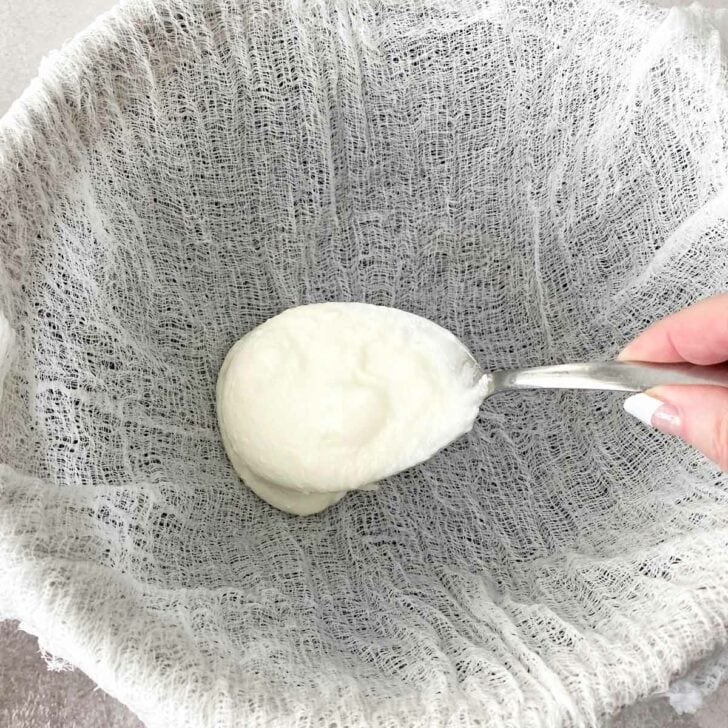
STEP ELEVEN: Put the strainer inside the large bowl, and spoon in all the yogurt to start the straining process.
Refrigerate for one hour. Pour out the liquid that has accumulated in the bottom of the bowl. This is the whey—that’s right, the very same delicacy Little Miss Muffet ate while she was sitting on her tuffet.
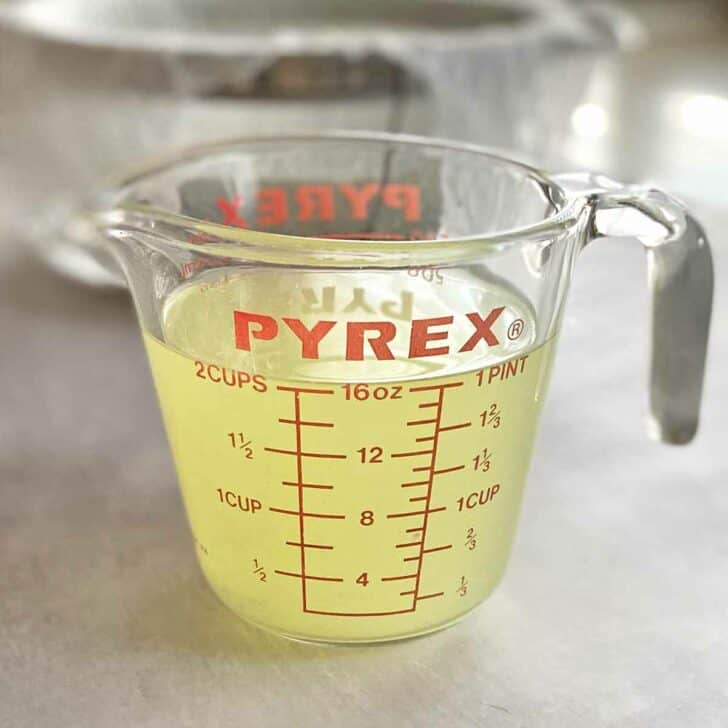
You can save the whey and use it for cooking or baking (like this yummy Whey Sourdough Bread).
Return the bowl to the refrigerator for one more hour, and strain the liquid again. Our batch drained off about two cups of whey, but you may have more or less and that’s fine.
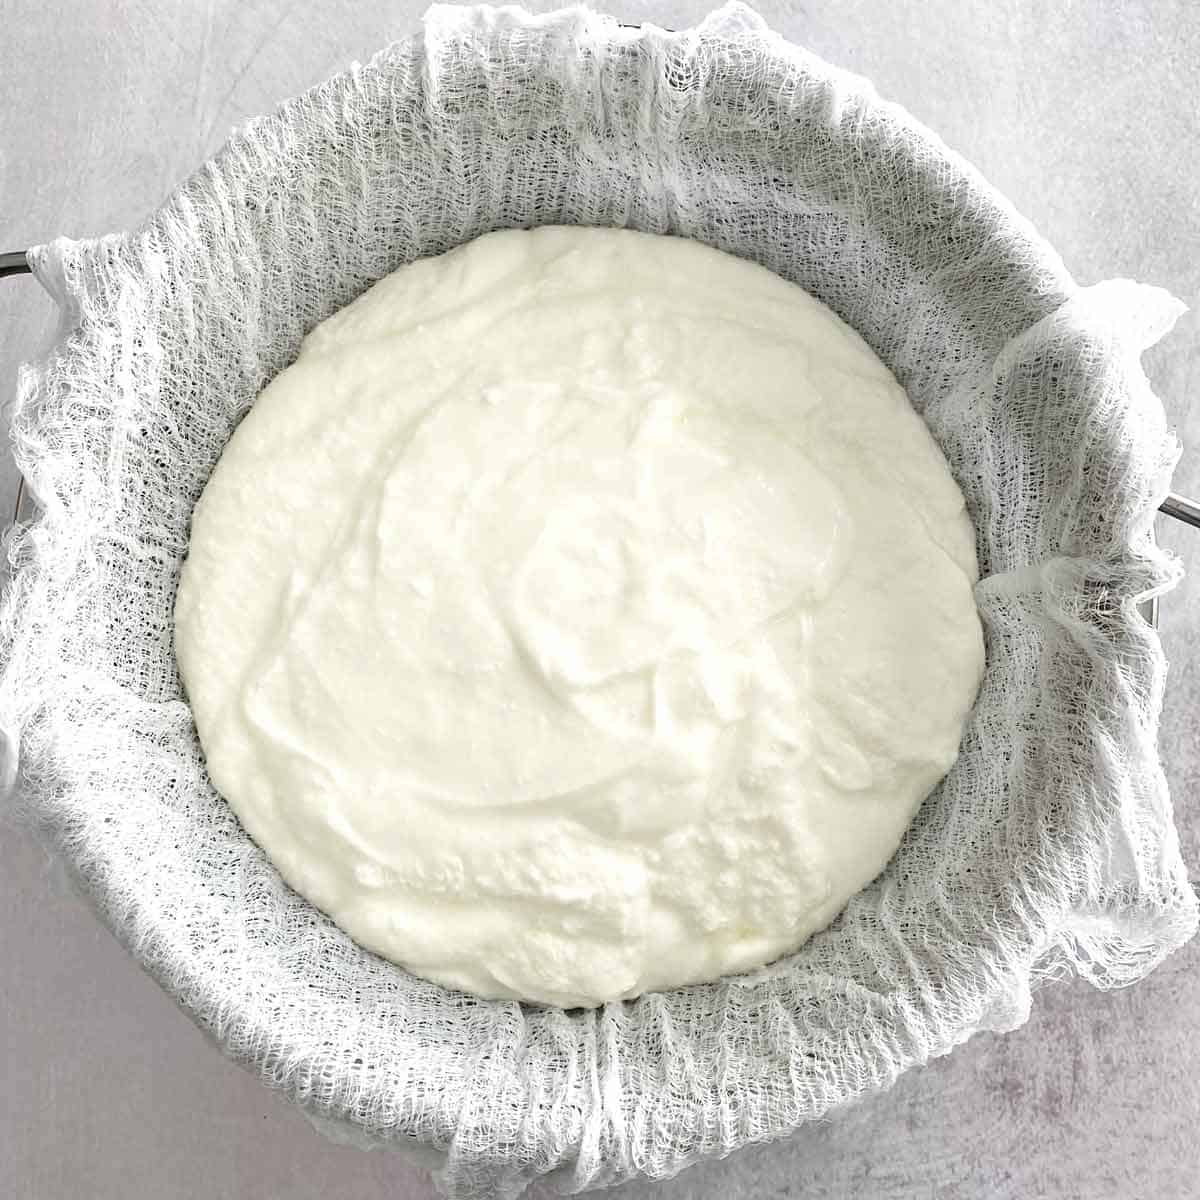
The yogurt should now look thick and creamy:
STEP TWELVE: It’s ready to serve! Transfer it to a bowl and stir it for a minute or two to smooth the thick yogurt before serving. Or spoon it into a container and refrigerate it, tightly covered, for up to a week. Makes about 6 cups, or 8 6-ounce servings.

Serving Suggestions
You can enjoy the Greek yoghurt as is, or top it with:
Remember to save a couple of tablespoons of your homemade yogurt so you can use it as starter for the next batch!
Other Ways to Use Greek Yogurt
- Use it in place of sour cream in your favorite dip recipe.
- Make Tzatziki Sauce, the sauce/dip that’s popular with gyros and in Mediterranean cuisine.
- Spoon it over a baked potato.
- Blend it into a breakfast smoothie.
- Make yogurt popsicles!
Troubleshooting: If Your Homemade Greek Yogurt Doesn’t Thicken
After many successful batches of homemade yogurt, I recently had a big FAIL. The only thing I’d done differently was to use our smaller, upper oven to incubate the yogurt instead of the lower oven I usually use.
When I pulled the yogurt out the next morning it hadn’t thickened at all; it was simply a big bowl of warm milk. I was so disappointed! At first I suspected the milk, because I’d used the big-name brand of organic milk that is known to be ultra-pasteurized. But when I measured the temperature of the milk, it was 130 degrees – too hot.
I decided to experiment with the failed batch, and let the milk cool back to 110 degrees. Then I added 2 more tablespoons of yogurt mixed with 1 tablespoon of milk. (My thinking was that the too-high temperature had killed the live cultures from the previously-added yogurt.)
I wrapped the bowl in a towel, put it in the lower oven with the oven light on, and let it rest for 8 hours.
When I opened the lid, I was amazed to see that the batch was thick and creamy. In fact, it was one of the thickest batches I’ve ever made. The consistency was slightly sticky, but after I strained the yogurt it was fine.
So if you ever have a batch that fails, you may want to try again and try to find the right spot where you can keep the yogurt at that ideal temperature of about 110 degrees F.
Printable Recipe Card
If you enjoy this recipe, click on the stars ⭐️⭐️⭐️⭐️⭐️ below to leave a rating! It helps us so much, and we love reading your comments, too!

Homemade Greek Yogurt
Equipment
- Candy thermometer
- Large mesh strainer
- Large mixing bowl
- Cheesecloth
- 3-quart casserole dish
- cooling rack
- Large dishtowel
Ingredients
- 1/2 gallon whole organic milk
- 2 1/2 tablespoons plain yogurt with active cultures
Instructions
- Pour 2 tablespoons of the milk in a small bowl and reserve.
- Pour the rest of the milk into a double boiler or heavy-bottomed pan and turn the heat to medium. If using a double boiler, cover the milk. If the pot is directly on the burner, stir it and watch it very, very carefully so you don’t burn the bottom.
- Heat the milk to 180 degrees F. It helps to clip a candy thermometer to the side of the pan so you can carefully watch the temperature as it rises. Or you can check frequently with an instant read thermometer.
- As soon as the temperature reaches 180 degrees, F, immediately remove the pot from the stove. Pour the milk through a wire mesh strainer into a 3 quart baking dish and leave it uncovered. Let the milk cool to between 105 and 110 degrees F, stirring a few times during the cooling process to prevent a “skin” from forming on top of the milk.
- Turn on your oven to the “warm” or “proof” setting. If your oven doesn’t have that setting, turn it to 150 degrees F.
- Combine the 2 tablespoons of milk you saved with 2 1/2 tablespoons prepared yogurt in a small bowl and reserve.
- Once the milk has cooled to between 105 and 110 degrees, add the yogurt-milk mixture and stir well to combine. Put the lid on the casserole dish and cover it with a dishtowel to help insulate it from temperature fluctuations.
- Turn your oven off, but now turn the oven light on. Just the light from the oven should keep the dish warm enough to enable the yogurt-making process. Put the towel-covered dish in the oven, making sure that the towel isn’t near the oven lightbulb, and leave the oven light on. Leave the yogurt undisturbed for 7 or 8 hours, or overnight.
- After 8 hours or the next morning, carefully take the dish out, unwrap it and remove the lid, and check to see whether the milk has turned to yogurt. If your batch isn’t quite thickened, return it to the oven and check on it again in an hour.
- Once the yogurt is sufficiently thickened, place the dish in the refrigerator for 3 hours. Cut 4 pieces of cheesecloth to fit inside a large wire mesh strainer. Run the cheesecloth under water and squeeze out as much water as you can.
- Line the strainer with the cheesecloth and place it inside a large mixing bowl. Spoon all of the yogurt into the strainer. Refrigerate for 1 hour and pour the liquid that has accumulated into a large measuring cup. Return the bowl to the refrigerator for one more hour, and strain the liquid again.
- Your delicious Greek yogurt is ready to enjoy! Stir it for a minute or two to smooth the mixture before serving. Or spoon it into a container and refrigerate it, tightly covered, for up to a week. Makes about 6 cups, or 8 6-ounce servings.
Notes
Nutrition
Save for Later
If you use Pinterest to save and share ideas, here’s a handy pin:


Eliza Cross is the creator of Happy Simple Living, where she shares ideas to help busy people simplify cooking, gardening, holidays, home, and money. She is also the award-winning author of 17 cookbooks, including Small Bites and 101 Things To Do With Bacon.


Thanks so much for this! I have made homemade yogurt before, but this method looks SO simple. I’m going to try it very soon!
Thanks, Annie – I was really surprised at how easy the whole process was. Plus – it was kind of fun, like a science experiment!
Eliza,
I was online this morning researching how to make my own Greek Yogurt and saw your posts. Looks great.
I too love Fage Greek Yogurt. Is what you make similar in taste, to that? I ask because I’ve had homemade yogurt but most of it is pretty tangy. The Fage does not have a tang and I prefer it without.
-Lisa
Lisa,
Most of the time the yogurt I make has the same mild flavor as FAGE. But occasionally it’s a little more tangy – although never as tangy as the “plain” grocery store yogurt. I think it has to do with the age of the milk. If you try the recipe, let us know how it turns out! :-)
I made this greek yogurt yesterday and it turned out great! Now I can make it for a fraction of the cost of store bought and mine is just as good if not better! Thanks so much for this recipe!
Michael, I’m so glad you were happy with the recipe. :-)
Quick question, I am wanting to make coconut Greek yogurt (not from coconut milk but with added shredded coconut) at what point do you add things like vanilla and or fruit/coconut etc? I am about to put my first batch in the oven.
Kadi, I would add the coconut at the very end, after you’ve strained the yogurt. Sounds delicious! xo
Hi There,
I realise that your posting on making my own Greek yoghurt is a few years old, but it never occurred to me to even try. The closest I’ve gotten was when I lived in New Zealand and couldn’t find the right yoghurt. Back then, I bought plain yogurt and drained it in cheesecloth to thicken it.
This method of yours looks doable.
Thanks for your post,
Hopefully,
Mrs Tammy J O’Malley
people always fogot to add any cost to produce yougurt, like heating milk, clean container…not mention it’s a bit time consuming, after all, u may not save money. but it’s a fun porcedure if you like it.
John, how do you find it not to save money. For a quart of high protein yogurt it is about 4.19. When you go to the store your self buy a gallon of milk for 2.12 you can make 5 quarts out of it. Its just simple economics.
Mrs. SPF is going to be SO happy about this article! Thank you so much.
We get LOCAL milk from Kawartha Dairy and it seems we can make this as a totally local mixture. Yum!
Using local milk is so great – can’t wait to hear about your own experiences in yogurt making.
mmm Kawartha Dairy. Only the best ice cream in the world! :)
I just made the switch to Stonyfield Greek Yogurt. It’s delicious, but not easy on the pocketbook. I’m going to try this recipe! Thanks for sharing.
My store doesn’t carry Stonyfield Greek yogurt, only the regular kind, but I’d like to try it (for research purposes, of course!) I also want to try the recipe you just posted, with the peanut butter patties Girl Scout cookies and Oreo cookie crust. YUM!
I love homemade yogurt! I use a thermos for a incubation stage, though I’ve heard of people using a slow cooker or even their car on a sunny day. I like your technique as well.
Kristina,
I love the thermos idea because it doesn’t use any electricity. A car on a sunny day? How funny. You could call it Passive Solar Organic Yogurt — doesn’t get much greener than that! :-)
I love making yogurt. I bought a very cheap yogurt maker, which does use some electricity but probably about the same or less as an oven light.
By the way, last week I made Indian paneer cheese from a quart of milk and lots of whey leftover so went online for ideas. One was to feed it the dogs. Mine loved it!
Our dog Maddie asked me to thank you very, very much for the suggestion about what to do with leftover whey!
Eliza, this stuff looks great. I was planning to do a post when I had some time to whip up my first batch of greek yogurt as well, although I havent gotten around to it yet. I may just give your recipe a try here in the coming weeks.
It’s so easy, you should definitely try a batch and then let us all know how it turns out!
Looks delicious! I like to make homemade yogurt, but now that two of us can’t eat dairy, I don’t make it. . .
You might not be able to enjoy homemade yogurt, but you make up for it with Snickeroos!
you may do a search for soy yogurt. i just recently heard of it.
Melissa,
I have also seen yogurt at Trader Joe’s made from coconut milk. Maybe give something like that a shot. Of course watching out for carrageenan and added sugar.
Lactose intolerance does not exclude greek yogurt if you prepare it properly. Research that. Look for “The Essential Diet” by Elaine Gotschall.
I have never tried Greek yogurt, but I do want to and your article has given me the motivation to do so. Not sure if I’m ready to make my own though…
Amanda, making yogurt is waaayyyy easier than making Tiramisu Cookies! :-)
I just want to point out (because I’m one of those pedantic foodies) that you’re not making Greek yogurt. You’re making Greek-STYLE yogurt. Just thickening regular yogurt doesn’t make it Greek yogurt. :)
IN order for it to be authentic Greek yogurt, it would need to be made from sheep’s milk or the higher fat cow’s milk that is available in Greece and other Mediterranean areas.
Greek yogurt seems to have become a fad/buzzword lately and all kinds of people are claiming to make/eat Greek yogurt … and they’re just not! :)
Thanks for pointing that out – I bet yogurt from sheep’s milk is soooo good! It totally makes sense that real Greek yogurt would naturally come from Greek cows or sheep. :-)
According to Wikipedia, “Greek yogurt is yogurt which has been strained in a cloth or paper bag or filter to remove the whey, giving a consistency between that of yogurt and cheese, while preserving yogurt’s distinctive sour taste” while Greek-style yogurt “may be thickened with thickening agents.” I had some store-bought ‘Greek-style’ yogurt a couple of weeks ago and it was disgusting – I later discovered it had gelatin added as a thickener.
Thanks for your comments, and readers, you will love Kara’s recipes and photos on her beautiful blog http://karacooks.com .
Dear Kara- I guess Fage isn’t “real” Greek yogurt then. Because their yogurt is made from cow’s milk. And the cows are from the United States. And I happen to think that your comment was totally rude.
Ok, I am using fresh goats milk, I milked it myself…it took a few milkings to get the 1/2 gallon, but my first batch is in the cooling stage, I am so excited I cant wait to try it! I live on Fage yogurt and go thru 48oz in less than 2 days, I mix it with whey powder, and some sort of frozen or fresh fruit, I’ve been ill and the yogurt is really helping, we would go to costco and buy a case of Fage at a time, its around $7 per 48oz. A bag of goat feed is $16, she uses 2 a month, so I am saving a bunch and I know what is going into her milk. I was wondering would the Greek style goat yogurt have nearly the same protein content? BTW…my blueberries are starting to turn pink so we should have fresh blueberries in no time! That is going to be awesome the yogurt and fresh berries!
Wow, thanks for sharing that recipe! It doesn’t look that difficult and it looks really delicious.
You are going to love this recipe – the yogurt is just amazing. I liked your recent article about sharing with neighbors, too.
Try leaving the yogurt draining in the cheesecloth even longer and you have cream cheese. Its a little different flavor, but really good on bagels!!
Several months ago, I learned how to make Lebneh (also called Kefir cheese). The process is nearly identical to “Greek-style” yogurt, except a little salt is mixed in before pouring into the strainer and the straining period lasts between 12-24 hours. The end result is somewhat similar to cream cheese and is enjoyed by drizzling a little olive oil over it, sprinkling a few herbs (such as basil) and dipping pita bread into it. It is also used as a base for many middle eastern dishes.
As another person mentioned, with a longer straining time, the resulting cheese practically peels off of the cloth. The cloth I use is simply a “bread” cloth, one layer, which I tie at the corners and hang from a hook under the cabinet with a bowl underneath. The weight from hanging is greater than just resting a strainer in a bowl, so more whey is drained away.
Even though it is called Kefir cheese, it is most traditionally started with yogurt. However, I have made it with actual Kefir (homemade) as well. The yogurt base creates a mild flavor while the Kefir is more tart. Yet it is nice to have a cultured dip alternative regardless of the base.
Incidentally, our teens like it drizzled with honey and nuts!
You know that Organic yogurts in the United States are usually shipped as powder from New Zealand, hence all the down under connotations in yogurt marketing.
http://www.businessweek.com/magazine/content/06_42/b4005001.htm
Thanks for providing the link to that article, which I hadn’t seen. We clearly need more organic growers and producers here in the U.S. to meet the increased demand for good, clean food.
I used your recipe and it was really helpful, but you mentioned heating the milk to 180F. That step is unnecessary because it is pasteurization which is meant for raw milk.
You just need to warm milk to a temperature 115F – what I call jacuzzi temperature – where your bacteria will grow. Hope this helps
cheers
Thanks for sharing your comment. I’ve read various recipes and methods, but I can’t personally vouch for them. According to the National Center for Home Food Preservation, heating the milk to 180 degrees F is necessary for creating a safe product.
The usual reason for heating milk to 185 is not for *safety* (since most milk in the U.S. has already been pasteurized).
What it does is to denature the proteins or something like that which makes the resulting yogurt thicker than it would have been without the higher heat (and holding it for awhile at 185 or so makes that effect even stronger–I just leave mine in the microwave awhile after heating it before removing to cool back to 115).
Thanks for this info. I make lots of fresh cheese products and always wondered why most yoghurt recipes call for a high temperature step. I prefer to use fresh raw milk that I rarely pasteurize as my provider does a PCR test and I use it within 24 hrs of collection.
It works well for fresh cheese but I’m guessing the yoghurt wouldn’t set up correctly. Thanks for saving me a ruined batch!
Shannon
p.s. Someone earlier mentioned the New Zealand yoghurt. I got hooked on it when I visited once and still order yoghurt sachets from there from time to time. It’s *so* tasty!
So… what if you are using Raw milk? There is a reason I buy raw… I don’t want to kill everything in it. Can I use the lower temp?
I grew up in India with my mom getting fresh milk and pasteurizing it at home by boiling. For making yoghurt she would just reheat the refrigerated milk slightly and add starter. I tried this number of times here in US when I was new at cooking, never worked. Then someone suggested boiling it again and then cooling down before adding starter and success! I don’t know why this is so since the milk here in US is already pasteurized. So my method is pretty simple. Every day I put milk in a pyrex container in the microwave. Turn it off just when it starts to boil, leave in it for 2 minutes so it doesn’t boil over me, then take it out and leave it on the counter to cool. Then I keep poking my finger in to see if i can bear the heat for 2 seconds. If I can, then it’s time to add starter, mix and set in in a corner for 3 hours, well wrapped in a towel. Refrigerating it just when it is “almost” but not completely settled will give a more thicker yoghurt without any whey on top, very important if you’re using lowfat milk like me.
Sounds like a very easy method!…. though not entirely sanitary if you keep sticking your fingers in it, lol! :)
Hi, sounds so easy. But, how much milk and how much starter? How much does that make? Thanks for the share. Sandi
Actually, heating the milk to 180 for 5-10 minutes changes the protein structure and enhances the texture. Even better with raw milk, a good step for any milk.
This is an awesome article. I’m gonna show this to my wife and give it a shot!
Thanks, Jonathan – let us know how it turns out! It’s so easy, I’ve stopped buying yogurt and just make it here now. Plus, I’ve discovered that organic milk that’s nearing its expiration date (perfect for yogurt making) is often on sale at our store.
Thanks for posting this. We’ve been making homemade yogurt for a year or two but now I want to try making Greek yogurt.
This may be a silly question but do you throw out the cheesecloth after using it? I’m not picturing how one would clean it for future use. Thanks!
Great question! I actually tried to rinse out the cheesecloth after using it, but it was kind of a falling-apart mess. I think someone with more patience could possibly submerge the cheesecloth in a big bowl of water, gently rinse it, maybe repeat a time or two, squeeze it out and hang it to dry.
Try butter muslin if you can find it. I order it online from a cheesemaking place in New England (I think the website is just cheesemaking.com or something simple like that).
It can be used multiple times and is very strong. To clean, I rinse it right after using and then boil in water with baking soda. I would never use soap but that seems to work well for me.
Hope that helps!
Shannon
I use J Cloths! they work wonderfully and can be rinsed easily.
My understanding is that you can wash and reuse *real* cheese cloth. It all depends on what you have. “Cheese cloth” that you buy at most stores isn’t the real thing. It works great for certain uses, buy you’d never use it to make cheese, etc. The holes are bigger, the weave looser. This stuff seems to fall apart.
You can find real cheese cloth online. We get ours at an Amish store in Lancaster, PA. I haven’t tried it myself yet (though I may do it today) but once I’ve hemmed in the edges, it should work nicely and be wash and reusable (an Amish woman I talked with told me she does this.)
Hope this helps!
Great tip, Babychaser! An Amish store seems like the perfect place to buy real cheesecloth, and I’ve been trying to find a source because the grocery store variety is also very expensive for what you get. As far as how long it keeps, I’ve read varying recommendations from 5 to 10 days. Some sources say if you keep it longer, less of the “good” bacteria remains.
I use an old tee shirt. I don’t cut it or anything, I just set it into the strainer so that it is two thicknesses, and pour in the yogurt. It will sort of peel off the next day, and I just put it in with the rest of the wash. It works perfectly.
I just made my first batch of yogurt today. For the incubation stage: the recipe I followed had you pour it into glass jars and then put the jars in a cooler with hot tap water up to the yogurt level. Way easy.
That does sound easy, and I like the fact that it doesn’t use any energy. Thanks for sharing this tip, Gaylynn.
I’m curious…What makes you say it will last 6 days??? Is it because you’ve stripped the whey? I usually keep my “regular” homemade yogurt 10ish days, which is nice because we can only get our raw milk on Mondays… so I need my starter to last at least that long.
Any input would be welcome.
I researched the recommended time to keep homemade yogurt online, but I’m not surprised that your experience proves otherwise. We’ve kept ours longer, too, with no ill effects.
Thanks so much for the yogurt recipe – this is our first year with icelandic sheep and goats, so we are experimenting with the milk – can’t wait to try it. I’ve made Feta cheese with the goat’s milk – yummy – basil and garlic added too
Wow, Linda, that feta cheese sounds so good!
did you know… that yogurt incubation can be achieved by placing prepared yogurt mixture in a sealed container(i.e. a 32-oz. old yogurt carton), and putting container in a cooler. add enough HOT tap water to cooler to fill it about half-way up the side of the container. close lid of cooler…. don’t peak!… and check in about 4 hours… ta-da!!! totally energy-free incubated yogurt. secondly, instead of cheese cloth, how about recycled sheer curtains cut into appropriate sizes and placed over colander… pour yogurt into curtain/colander and strain.
Thanks for these tips, Tina. I’ve also heard that a heating pad on low can incubate yogurt.
Except the energy it requires to heat the water of course.
Hi Eliza!
This is a great recipe and such a clear, thorough tutorial. We decided to share it with our readers on DietsInReview.com.
You can see the link back to this post here in our Q&A section: Which Yogurt to Use on the 17 Day Diet.
Thanks for your post!
Thank you, Brandi! How nice of you to send your readers our way. I enjoyed reviewing your site, too. :-)
Can I try this with a smaller amount of milk to start? I’ve never tried it before and just want to try it with a smaller batch. How would I adjust the measurements?
Yes, you can make this recipe with a quart of milk. You’ll need 1 to 1 1/2 tablespoons of plain yogurt with active cultures to add to the mix. All the other directions will remain the same, and you should end up with about 2 cups of Greek yogurt when you’re through. Good luck!
While out grocery shopping I spotted half-gallons of organic milk and remembered this recipe. Since I love Greek yogurt, I decided to give it a try last night.
I had just put the starter/milk mix into the oven when I looked again at the milk carton. Then I saw the words of doom waaaay down at the bottom and in small print: ultra-pasteurized.
I know ultra-pasteurized is a no-no for cheesemaking since the process messes up the milk proteins, but I crossed my fingers and hoped for the best.
It’s yogurt–sort of. Quite mild and tasty, but way too thin. When I tried to strain it, the whole thing oozed through. That’s the bad news.
The good news is that it’s the perfect consistency for making lassi! (Indian yogurt drink) I don’t need the blender anymore to get a smooth drink. Hurray! One less thing to wash.
Must try again with proper milk, though.
Thanks! Just noticed the same issue with the milk I’m using right now to make yogurt! Ugh!
Kirsten, how did your yogurt turn out? It seems like much of the organic milk in stores is ultra-pasteurized. (A long expiration date is a big tip-off!) However, I’ve made several batches of thick, creamy yogurt with ultra-pasteurized milk and it didn’t seem to affect the recipe above. You might enjoy this thread on Chowhound which has more information about why yogurt can sometimes have a thin consistency and tips for success. I added a note about this in the recipe and appreciate your comments. Joanne, I love your idea to use thin yogurt in lassi!
My husband has been very into making yogurt lately, but it’s too thin for my taste, and I so love Fage Greek yogurt — so I’m very excited about this! If one extra step can give me that consistency, I’m all for it. Reading through the comments, I’m now wondering: if “ultra-pasteurized” is what I DON’T want to see on the carton, what is it that I DO want to see?
Also — I know that Greek yogurt is known for being very high in protein… does this recipe fit that bill as well?
Just look for regular pasteurized milk, organic if possible. And yes – Greek yogurt is higher in protein because it’s more concentrated. Good luck! xo
Eliza, it was use the stuff in lassi or cry. :) I tried again, this time with regular milk. But the only non-fruited, active culture yogurt I could find in that store was a Stonyfield Greek with honey on the bottom. Unfortunately it also had carob bean gum and pectin added to it.
Same result: too-thin yogurt. This batch I heated to almost boiling, added 4 T. of lemon juice to it, and left it for a while. When the whey had separated enough, I drained and pressed it in its cloth. I added a bit of kosher salt before I stuck it in the fridge and it seems to be a nice little “ricotta” sort of thing.
I will admit that after reading another post, I did not heat the milk to 180. After reading on the link you provided (thank you!), I most certainly will for Try #3. For all I know, that was what messed up the previous two tries, not the ultra-pasteurized milk (which you’ve had success with) or the thickeners in the Stonyfield yogurt.
Wish me luck!
YES! It worked!
Thanks for this recipe, Eliza.
Hurray! I’m so glad you were happy with the recipe, Joanne.
From my knowledge, you CAN use more yogurt, but if you do that, you can’t let it sit as long. For example, if you used like, a cup of yogurt, you’d only let it sit for about 3 hours. Since you only use a small amount, it requires much more time to build up the bacteria.
As well, I read another person’s comment saying that it’s fine to forgo heating the milk to 180 if it’s undergone pasteurization already. This is untrue. It still needs to be heated up. There are different methods of pasteurization, anyway. Not all of them heat the milk to 180.
Also, little miss muffet ate curds and whey, essentially cottege cheese.
You’re right – you do need to heat the milk to 180 degrees whether it’s pasteurized or not. And thanks for the clarification about Little Miss Muffet!
Hi! Quick question…the reserve 2tbs of yogurt that you retain for a starter for your next batch…how long can that be kept? Can it be frozen to be kept longer?
Also, the yogurt that you purchase for a starter, does it matter if it’s already greek yogurt? For example, I have a tub of Chobani vanilla flavored greek yogurt in my fridge. Can I use that? I’m not that concerned about whether it’s organic or not.
Hi Crystal,
I’ve read that you can freeze the yogurt that you’re going to use later to ‘start’ the yogurt. I haven’t tried it but it sounds like it will work just fine. You can absolutely use the Greek yogurt you already have in the fridge to start your homemade batch. The important thing is to make sure it has those active cultures, and there should be a notation to that effect on the side of the carton. Good luck and let us know how it turns out!
~Eliza
Hi there – I have a question about the yogurt making process in your recipe. Can you tell me about the food safety aspect of leaving the milk out overnight, or for more than four hours? I want to try this but I don’t understand how this process is “safe”. I understand you must need a way for the good bacteria to grow but how do you stop the bad bacteria from growing? Please help! I’d love to make this! Thank you!
Deborah,
Great question! If you make sure to heat the milk to 180 degrees, use clean utensils and discard any yogurt that fails to set properly you shouldn’t have any worries. Here’s a little more information from the National Center for Home Food Preservation:
“Yogurt provides two significant barriers to pathogen growth: (a) heat and (b) acidity (low pH). Both are necessary to ensure a safe product. Acidity alone has been questioned by recent outbreaks of food poisoning by E. coli O157:H7 that is acid-tolerant. E. coli O157:H7 is easily destroyed by pasteurization (heating). Therefore, always pasteurize milk or use commercially pasteurized milk to make yogurt.
Discard batches that fail to set properly, especially those due to culture errors. Yogurt generally has a 10-21 day shelf life when made and stored properly in the refrigerator below 40°F. Molds, yeasts and slow growing bacteria can spoil the yogurt during prolonged storage. Ingredients added to yogurt should be clean and of good quality. Introducing microorganisms from yogurt add-ins can reduce shelf life and result in quicker spoilage–“garbage in, garbage out”. Discard any yogurt samples with visible signs of microbial growth or any odors other than the acidity of fresh yogurt.
Always use clean and sanitized equipment and containers to ensure a long shelf life for your yogurt. Clean equipment and containers in hot detergent water, then rinse well. Allow to air dry.”
I’m wondering if there’s a way to figure out protein content in this recipe? The reason I use Greek yogurt is for high protein & low sugar and am wondering if this recipe would be good for it???
Dear Emily,
If you make regular yogurt, the protein content will be identical to the ingredients you use. If you make Greek yogurt, some of the protein will drain off in the whey so it’s trickier to estimate the exact protein content.
If you want to increase the protein content in this recipe, you can add 1/3 to 1/2 cup powdered milk to the regular milk before you heat it.
Good luck, and if you try adding the powdered milk I’d love to hear back from you about whether you’re happy with the result!